
How to Setup Your Swipechain Devnet Node
Introduction
Here we will help you set up an Swipechain Devnet Node, which relays transactions and is used for testing development on the Swipechain Devnet network.
Bare-Metal
Minimum Requirements
The setup is only suitable as a Delegate Devnet Node or an Swipechain relay Node.
- 1 Dedicated CPU Core
- 4GB Ram
- Linux
- 20GB Free HD Space
Recommended Specifications
- 2 CPU Cores+
- 8GB Ram+
- Ubuntu 16.04
- 40GB+ SSD
Prerequisite Setup
Provision a Linux Server
Running an Swipechain Core Devnet node is not like Bitcoin mining, and thus there are more options to choose from. AWS, Linode, Digital Ocean, Vultr, Microsoft Azure, and OVH are just a few recommended choices.
Delegate Nodes have a higher minimum requirement on the hardware specifications. These nodes are the security of our network so their uptime is of most importance in making sure the network runs smoothly.
We recommend using Ubuntu 16.04 however you are free to use any version of Linux you're comfortable with. These guides use Debian flavored Linux variants though.
With each provider, the setup process for creating a new virtual server is going to be different. If choosing one of the listed providers, we have created quick links below to get started quickly.
Connect to Your Server
After creating a server, we need to connect to it. Your provider should have given you an
IP address, username, and password to connect to your new server.
This information can usually be found somewhere in your provider's dashboard for your new server.

Depending on your operating system you will connect to your server in different ways. Windows users will want to use something like PuTTy or the newer Windows Subsystem for Linux. When using the WSL, the Linux part of this guide should be relevant.
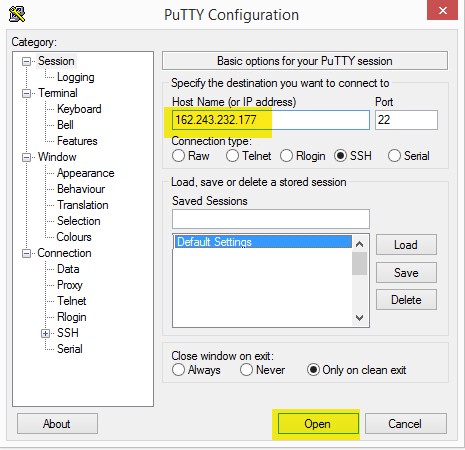
Windows
Open PuTTy and place the IP address given to you by your provider in the
Host Name field as shown below. You should probably save this host, so you don't
have to enter it every time.
MacOS / Linux
Open up a new terminal window and type in the following to connect to your new
server via SSH.
ssh user@ipaddress
When first connecting to your new server you will be asked to cache the servers host key and validate the RSA fingerprint, click yes. If this message appears after you have already configured your server, take precautions, it might have been compromised.
The authenticity of host '{SERVER_IP}' can't be established.
ECDSA key fingerprint is SHA256:kgjgjfihut985ht984754643354+hrQ.
Are you sure you want to continue connecting (yes/no)?
When prompted, use the password given to you by your cloud provider. Some providers will require you to set up a root password when creating the VM, while others may give you a temporary password.
Create a User
Executing this guide as the root user should be avoided. Instead create a new, dedicated user to manage Swipechain related software. On your server type the following into the command line and press enter. Where username is the name you want to log in with:
adduser username
You will be prompted to enter in the users full name and some other information.
Feel free to leave them all blank as they are optional. When prompted, type Y and press enter.
Adding user 'swipechain' ...
Adding new group 'swipechain' (1000) ...
Adding new user 'swipechain' (1000) with group 'swipechain' ...
Creating home directory '/home/swipechain' ...
Copying files from '/etc/skel' ...
Enter new UNIX password:
Retype new UNIX password:
passwd: password updated successfully
Changing the user information for swipechain
Enter the new value, or press ENTER for the default
    Full Name []:
    Room Number []:
    Work Phone []:
    Home Phone []:
    Other []:
Is the information correct? [Y/n] Y
Granting Sudo Privileges
Next, we need to make sure that our user can do all the things it needs to do. Type
the command below into your command line and press enter. Where username is the
name of the new account you created. This will give our user sudo privileges.
Now you are allowed to run programs with the security privileges of another user.
By default, this is a superuser.
usermod -a -G sudo username
Installing Swipechain Core for Developers
We're now ready to begin installing Swipechain. The initial install may take a while and at times appear not to be doing anything. Please have patience and let the process finish.
Switch to the Swipechain User
While installing Swipechain Devnet Core, we should use the Swipechain user that we created above and go to the base directory. To switch to it, run:
sudo su - username
cd ~
Running Swipechain Core Installation Script for Developers
Installing Swipechain Devnet Core is a straightforward process. We will use Swipechain installer script that will install all of the necessary dependencies, Swipechain Core onto your server and publish configuration files for it. To install essentials run this command:
bash <(curl -s https://raw.githubusercontent.com/Swipechain/swipechain-core/develop/install.sh)
You will be asked to input your current users password for sudo privileges. Write or paste it and press enter to start installation process.
Process might take a while, don't interrupt it and wait for it to finish.
Selecting Swipechain Core Network
Once installation of dependencies and Swipechain Core is finished you will need to select on which network you wish to operate. This can be achieved by pressing up or down arrow keys and confirming selection with enter.
Mainnet is public network, Devnet is development network for testing and Testnet is our private testing network.
? What network do you want to operate on? › - Use arrow-keys. Return to submit.
❯  devnet
   mainnet
   testnet
Devnet is to play with Swipechain for the first time, select devnet and request DSXP coins in our public Telegram or [faucet] (https://faucet.swipechain.org/).
After you made your selection you will need to confirm by pressing y and confirm with enter
? Can you confirm? › (y/N)
With that we have successfully installed Swipechain Devnet Core and published our configuration options.
Configuring Swipechain Devnet Core Database
The Swipechain Devnet Core essential configuration is to configure database parameters. You will be presented with a prompt:
Would you like to configure the database? [y/N]:
Press y and confirm with enter.
You can input any custom database credentials you want to use or use the one provided below:
Enter the database username: swipechain
Enter the database password: swipechain
Enter the database name: swipechain
This will create PostgreSQL role and database to be used for storing blockchain data.
Configuring New Transaction Types
Since Swipechain Devnet Core is running on 2.6 with new transaction types you need to include these by opening the plugin.js file .
nano ~/.config/swipechain-core/devnet/plugins.js
Then add: "@swipechain/core-magistrate-transactions": {},
after "@swipechain/core-state": {},
Press ctrl+x and Y to save and exit the file.
It should look like this:
module.exports = {
    "@swipechain/core-event-emitter": {},
    "@swipechain/core-logger-pino": {},
    "@swipechain/core-state": {},
    "@swipechain/core-magistrate-transactions": {},
    "@swipechain/core-database-postgres": {        connection: {
            host: process.env.CORE_DB_HOST || "localhost",
            port: process.env.CORE_DB_PORT || 5432,
            database: process.env.CORE_DB_DATABASE || `${process.env.CORE_TOKEN}_${process.env.CORE_NETWORK_NAME}`,
            user: process.env.CORE_DB_USERNAME || process.env.CORE_TOKEN,
            password: process.env.CORE_DB_PASSWORD || "password",
        },
    },
    ...
That's it, you are all set!
Starting Swipechain Relay Process
To start Swipechain relay process and with it synchronization process with Swipechain blockchain we need to start relay process with our integrated CLI:
swipechain relay:start
If the process has started you will get a message:
Starting swipechain-relay... done
TIP
All CLI commands with description can be viewed at CLI Commands or by running swipechain help command.
Putting your Delegate Passphrase on your Devnet Node
Option 1 Use the command below to insert your passphrase:
swipechain config:forger:bip39 --bip39="..."
Option 2 Open the file below:
nano ~/.config/swipechain-core/devnet/delegates.json
and put your phassphrase between secrets: [] and add "", then it should look like this:
secrets: ["passphrase(12words)"]
Check if your wallet adress is right in the log files:
"swipechain forger:log"
Checking to See if your Devnet Node is Syncing
Your Devnet Node probably isn't syncing with the other nodes at the moment, run the commands below to select the right channel.
swipechain relay:stop`
swipechain config:cli --channel=next`
swipechain relay:start`
Checking to See if Everything Is Working
Now we want to see if the Swipechain relay process has started the synchronization process you can do that by running one of these two commands
swipechain relay:log
or
pm2 logs
If the process has started you will see a lot of messages like this (with actual data)
[YYYY-DD-MM hh:mm:ss][DEBUG]: Delegate <delegate name> (<public key>) allowed to forge block <#> 👍
Note that depending on the network you use synchronization of the blockchain and the node specifications this can take upwards of 10 hours.
Recommended Configurations for a Mainnet Forger Relay
WARNING
Default configurations that ship with Core are meant for the use of normal relays.
If you are a forging delegate on mainnet you are strongly advised to take additional security measures and disable as many public access points as possible on your relay to minimise the surface for possible attacks.
We recommend to run multiple relays on mainnet to strengthen the the network and to make it possible to disable public access to things like the API on your relay that is connected to your forger.
Simple things like whitelists can already go a long way to limit the access of outsiders to public facing services like APIs or your plugins that might expose public access.
Whitelisting Public API Access
The first thing that we recommend that should be done on a relay that is used by your forger to retrieve all forging related information is to limit the Public API access.
Open the ~/.config/swipechain-core/{NETWORK}/plugins.js file and locate the @swipechain/core-api entry. By default you will see an entry for whitelist: ["*"] which means everyone can access your Public API which is recommended for relays but as this part of the guide is about a relay used for a forger we will change this setting.
We recommend to limit the whitelist to IPs/Servers that you control or know are trusted. Simply changed the whitelist setting to whitelist: ["ip-you-trust", "ip-you-trust", "ip-you-trust", ...] and restart your relay. Now only the trusted IPs will be able to access your Public API.
Notes
- If you do not use the Public API at all you can simply remove it from your plugins.js file and restart your relay.
- Core ships with the Public API enabled by default because desktop and mobile wallets rely on access to it. It is your job as a delegate and node-maintainer to provide enough relays so that wallets and developers can have access to the Public API without having to hit forging servers with loads of requests.
What's Next?
Great! You have a working node, but now you should think about securing it. It is especially important if you plan on using a node as your delegate/forging node on mainnet.
In our next section, we'll discuss making sure your Swipechain Devnet Node is as secure as possible. As the Swipechain network grows, hacking attempts on delegate and relay nodes will become more prevalent. Defending against DDOS and other various attacks is extremely important in securing the network.